|
|
|
|
|
|
||
|
This
article is aimed at the newbie skinner, and includes:a brief history; installation
guide; quick troubleshoot; VERY short intro; and useful links for The
GIMP for windows, a free, fully fledged graphics program, ideal for the
skinner (esp the skinner with no budget!). Tutorial links at bottom of page!
The GIMP stands for GNU Image Manipulation Program. It is a program that rivals Photoshop in terms of features, and Paint Shop Pro in terms of price! It's ideal for people who are skinning, (slightly less ideal for wallpaperers) as it is packed full of features, and, like so many other things to do with skinning, it costs nothing more than the download. I use The GIMP. I really like The GIMP. In fact, I would almost go as far as saying that the weird kinda relationship I have with the program borders on the fetishistic. For some reason, it seems to inspire a weird kind of devotion in a lot of people who use it. I
used the GIMP to create all the skins and graphics I've ever made, apart
from some icons, although I use it for those now as well! And if my recommendation
is not high enough, I know of many skinners who have tried The GIMP, many
who like it, some who love it, and one very-well respected skinner who
practically swears by it. Because it's free. Yes F-R-E-E. As in speech. As in beer. It is complementary. It is gratis. There is no moolah required. You will not need a wad. No dosh, no spondoolies, no monies. Nada, nothing, nowt. Because it can do almost everything that the other major graphics programs can do, and a few things they can't. Like
Well, almost nothing. It's more a case of having to realize a few things about the program which affect the way you will interact with it. Please note the following things. The GIMP is not a native windows program. The GNU part of the acronym will have given that away to many of you. GNU stands for "GNU's Not Unix". GNU is basically another name for Linux, a free version of UNIX There are technical irregularities in that sentence, but this article is not the place to discuss them. For the remainder of the article, I will refer to GNU as Linux. Linux is an alternative operating system (i.e. you use it in place of Windows). If you don't understand any of what I just said, just understand this:the GIMP was NOT originally designed to have been run on Windows. The version I will be talking about, the one for Windows, is still heavily in development. It does occasionally crash. How occasionally varies from user to user and build to build. We'll discuss this in more depth later. But if you're going off in a huff about it already, consider this: you paid for Windows right? And Windows crashes doesn't it. (Well, maybe not NT or 2000 ;-) ), but the GIMP is free, so don't begrudge it the occasional crash OK? Because it is not a native windows program, it doesn't necessarily look like a "normal" piece of windows software. The interface is a bit different to most other windows applications - the main difference is that the main menu, normally found on the menu bar, is accessed by right-clicking on the image window. But stick with it, and in less than an hour, I guarantee you'll have the very basics well and truly sussed. a) The GIMP is not a native Windows program b) The GIMP is FREE Where do I get The GIMP? The easy way to install The GIMP is by getting it from the Win32 GIMP downloads page. Beware, the download on the www.gimp.org page is not the same as the one on the link above. What's the difference? I hear you ask. Well, the one I've directed you to, is an auto-installer, the windows version. The other one, at gimp.org, is the GNU/*nix program, so don't even bother d/l ing it! Unless you are a Linux user of course! Here's
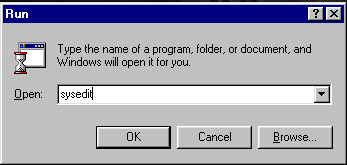
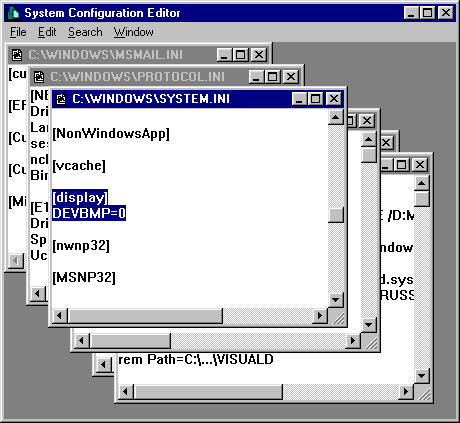
a step by step install guide: OK, so something's gone wrong. There are many reasons for this, here's one of the most common. If
you're getting weird lines across your display while gimp loads, or if
you have a problem writing in text boxes, (ie, you click in one to enter
a value, the existing value disappears, and then the program crashes)
then check to see what video card you have. I'll put money on it being
an Ati Rage card. If this is the case there is a fix. It involves a simple
system file edit. Now look, messing with entries in your system files
can seriously damage your computers health. So, BACK-UP any important
files first. All you are doing is adding ONE line to the system.ini file,
and you'd have to be a bit stupid/accident-prone to do anything seriously
damaging if you follow the instructions below to the letter. BUT
I will not take ANY responsibility if you damage anything on your computer
by doing the following. So do the sensible thing, and back-up first ok?
It won't load or save gif's! Yes
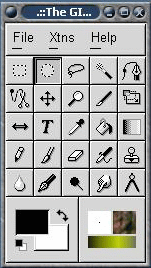
it will! What about the icons? Cor blimey you want it all don't you? On windows 95, there is a known bug that the system icon for GIMP, a cute character lovingly referred to as Wilbur, does not show on the taskbar, or in explorer. Or anywhere basically. This is what he looks like:  A quick, satisfactory work-around can be achieved by right clicking on your GIMP icon on the desktop (if you have one!) and selecting "Change Icon" then browsing to your GIMP plugins folder and pointing the shortcut to one of the plugins, whose icons you'll note, display correctly. Only if you're doing some major work, like a 1200x1040 wall or something.And I can inform you that the Linux version runs much faster than the Windows one on large images. That's why I said earlier that it was more suited to skinners than wallpaperers. But plenty of good walls have been done with The GIMP mind... esp tileable ones... check out the Solid Noise filter for starters. You can find it by Right-Clicking on the Image->Filter->Render->Solid Noise. OK, so you've got the program up and running right? This is what you should see... It
would be a bit silly of me to explain each of the tools in turn, but ones
which you should familiarize yourself with early on are the The
basic premise of The GIMP is this, you paint with the left mouse button,
and access menus via a right click on the image you are editing/creating/viewing.
If you find a menu is hidden quite beneath a load of others (I don't think
any are more than 4 layers away though), and you use it a lot, well click
on the top line of the window, which looks like this --------- and voila!
a tear off menu to place any where on your desktop. Also, if you want
to create a Hotkey for any of the menu commands, just highlight the relevant
menu entry, and then press the desired key-combo - as simple as that!
Patience! I could probably write a whole book about things you could do with knowing before and as you start getting to grips with The GIMP. But others have already started to do that. So, to finish this article, I'm going to give you a list of links to all the best tutorials and online books and resources. How to draw a straight line. not as stupid as it sounds, this is something many Photoshop users miss the first time round, as there is no seperate straight line tool in GIMP. Just read, and learn. GIMP for Windows FAQ. This new site as well as holding useful answers to commonly asked questions, allows you to submit your own question and answers if you think there's something missing. A good indication of the sense of community that exists amongst GIMP users. Tiger t's Layers tutorial. This should be the first stop you make after you download the GIMP, if you've never worked with layers or anything like that before. Shall I put that another way? GO THERE NOW!I followed this article to the letter, and was immediately much more at home with the GIMP! It is a fantastic tutorial. His site is full of lots of other cool stuff too, like a history of the splash screens. The GIMP manual This hefty tome is now missing a few plugins and script-fu documentation. But, as long as you remember that The GIMP is NOT a native windows program, you'll be fine, and will no doubt recognize this for the valuable resource that it is. Grokking the GIMP A more recent and more newbie-friendly book. Excellently written with tutorials, examples and lots of pictures. The site also features a fantastic public domain photo archive. Help index it! Gimp.org Tutorials Go here for some official GIMP tutorials! Great for getting you started... The GIMP for Windows Page. Visit it, read it, repeat as necessary. The WinGIMP user mailing list. About the single most useful help resource for WinGIMP users. A lot of the information from the article has been collected and/or verified by reading the list and asking pertinent questions. As with most e-mail lists, make sure you at least TRY and find your answer in the docs I've pointed you too before making a fool of your self on the list! There's nothing to be scared of, the people on the list are great, friendly, enthusiastic, and include the Tor Lillqvist, who did the porting, and who contributes almost daily to the list. I'd just like to take this opportunity to thank all who have helped bring the GIMP to windows. The main man is obviously Tor, and kudos and respect, as well as deepest thanks go out to him. Like the original GIMP, his development started as a part-time project, and has since spiraled into something bigger. Many thanks to him for all his continued hard work. **Since the main body of this article was written, a new build of GIMP for windows has been released. This version has no new features as such, but there are great improvements on stability (which I and many others still maintain was excellent beforehand) and other small bug-fixes.
|
||
|
|
||
 Please note, My GIMP is shown here with the WindowBlinds skin, K-Gnome
by KanedA. Obviously this is not going to look the same as yours if you
have a different Windowblind skin, or no skin at all. [Heh, and here's
something ironic - K-Gnome is a custom Linux GUI. I've skinned a Linux
program that has been ported to windows, with a WB that has been ported
from Linux. In fact I could be running Linux and you'd never know hahaha].
Please note, My GIMP is shown here with the WindowBlinds skin, K-Gnome
by KanedA. Obviously this is not going to look the same as yours if you
have a different Windowblind skin, or no skin at all. [Heh, and here's
something ironic - K-Gnome is a custom Linux GUI. I've skinned a Linux
program that has been ported to windows, with a WB that has been ported
from Linux. In fact I could be running Linux and you'd never know hahaha].